How to Replace Old Ductwork: A Step-by-Step Guide

When you think about home improvement projects that add value, you might picture a new kitchen or bathroom. But what about the systems that keep your home running efficiently? Replacing your ductwork is a powerful upgrade that pays you back with lower energy bills, better indoor air quality, and consistent comfort in every room. It’s an investment in your home’s health and your family’s well-being. Making the decision to upgrade is the first step, but understanding the process is key. We’ll break down everything you need to know about how to replace old ductwork, covering the costs, materials, and the critical differences between a DIY attempt and a professional installation, ensuring your investment delivers results for years to come.
Key Takeaways
- Connect common issues to your ductwork: Frustrating hot spots, rising energy bills, and excessive dust are often symptoms of a failing duct system, not just a problem with your AC unit itself.
- Professional installation is about more than convenience: Hiring a licensed pro ensures your new ductwork is correctly sized and sealed for maximum efficiency, meets local building codes, and keeps your HVAC warranty intact.
- The right materials and regular upkeep are key: Choosing durable, well-insulated ducts is the first step; following up with simple inspections and professional maintenance ensures your system runs efficiently for its entire lifespan.
Is It Time to Replace Your Ductwork? 4 Telltale Signs
Your home’s ductwork is like its respiratory system—out of sight, but essential for breathing easy. It carries cool air from your AC unit to every room, and when it’s not working correctly, your comfort and your wallet can suffer. Since ducts are usually hidden in attics, crawl spaces, or walls, it’s easy to forget about them. But just like any other part of your home, they have a lifespan. If you’ve noticed something feels off with your home’s climate, your ductwork might be sending you signals that it’s time for an upgrade. Paying attention to these signs can save you from high energy bills and poor air quality down the road.
Hot and Cold Spots in Your Home
Do you have a room that feels like a sauna while another feels like an icebox? When your ductwork is damaged, leaking, or improperly sized, it can’t distribute air evenly. This creates frustrating temperature imbalances throughout your home. You might find yourself constantly adjusting the thermostat, but the real problem lies within the ducts. Look for signs like significant temperature differences between rooms, musty smells, or unusually loud noises when the air kicks on. These are all clues that your duct system is struggling to do its job, preventing conditioned air from reaching its destination and leaving you with uncomfortable hot and cold spots.
Your Energy Bills Keep Climbing
If your monthly energy bills are creeping up with no obvious explanation, your ductwork could be the culprit. Leaks, cracks, and poor connections in the ducts allow precious cool air to escape into your attic or crawlspace instead of cooling your home. This forces your AC system to work much harder and run longer to reach the temperature you’ve set on the thermostat. In fact, experts estimate that leaky ducts can make your heating and cooling system up to 20% less efficient. Replacing old, inefficient ducts is an investment that can lead to significant savings on your utility bills over time.
Dusty Rooms and Poor Air Quality
Have you noticed you’re dusting more often than usual? Or are your allergies acting up inside your own home? Your ductwork might be to blame. Holes and gaps in the ducts can pull in dust, pollen, insulation fibers, and other contaminants from your attic or crawlspace and circulate them throughout your house. This not only creates a layer of dust on your furniture but also seriously impacts your indoor air quality. Old ducts can also harbor mold and mildew, which can release spores into the air you breathe. If your home feels stuffy or you’re concerned about airborne pollutants, inspecting your ducts is a critical first step.
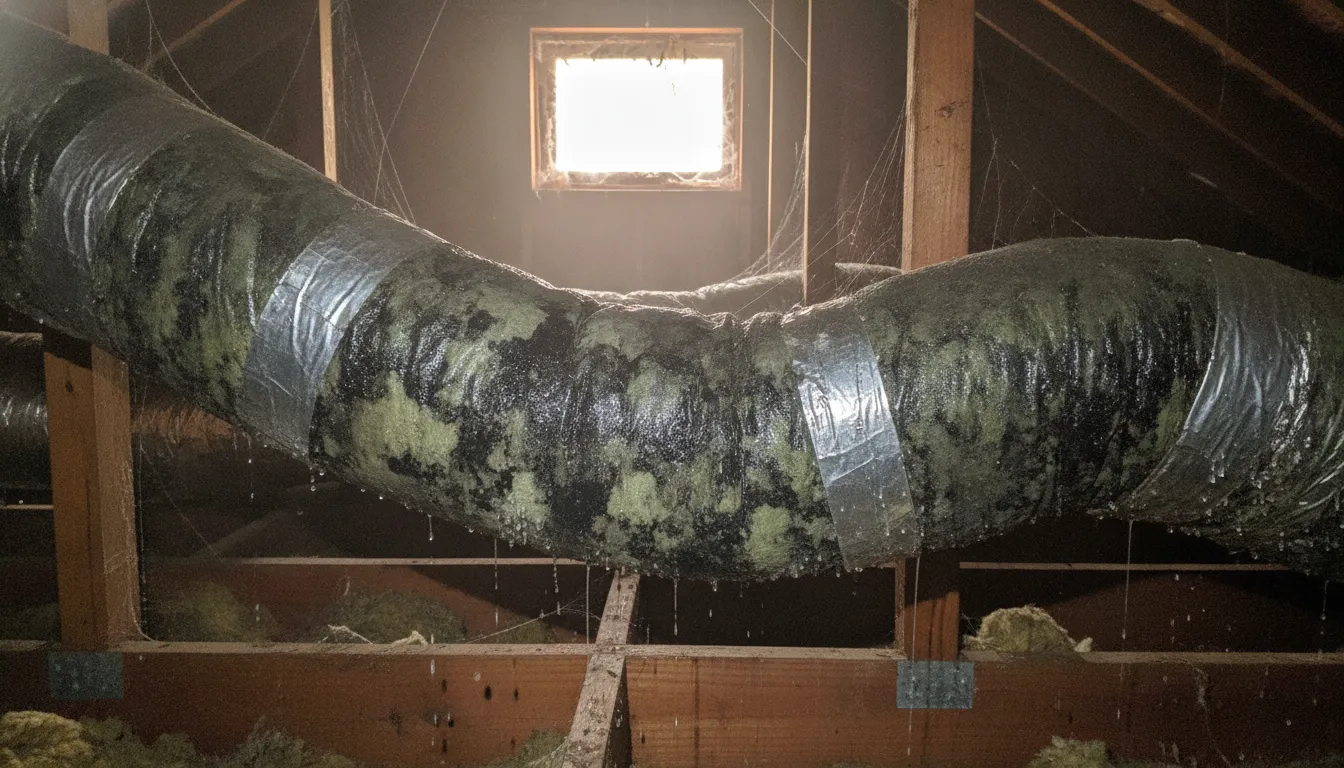
You Can See Damage, or Your Ducts Are Old
Sometimes, the signs of failing ductwork are right in front of you. A quick visual inspection might reveal crushed sections, tangled flexible ducts, or areas that have completely disconnected. You might also see rust or corrosion on metal ducts. Age is another major factor. Most duct systems are designed to last about 10 to 15 years. After that, the materials start to break down, and the seals can fail, leading to leaks and inefficiency. If your ducts are approaching that age or you can see visible damage, it’s a clear sign that a replacement is on the horizon.
What Does a Ductwork Replacement Actually Involve?
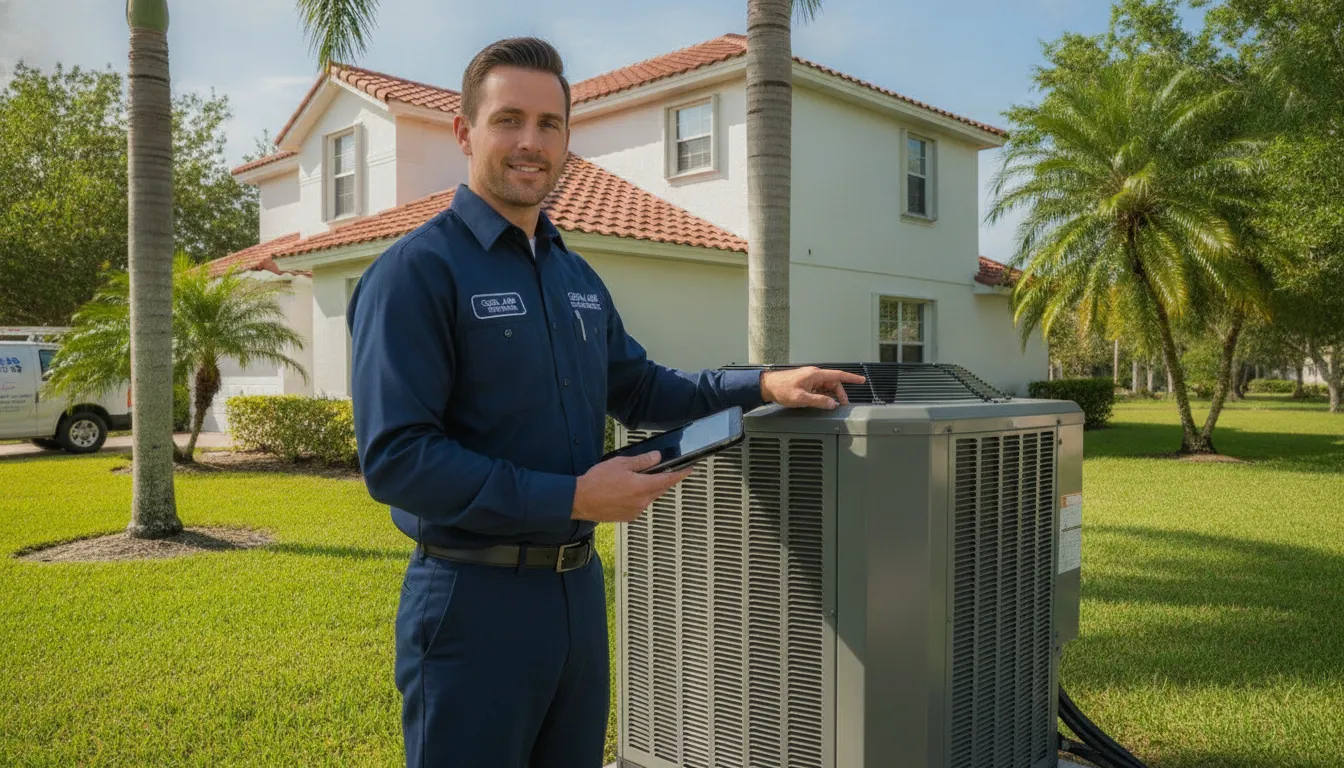
Replacing your home’s ductwork might sound like a massive undertaking, but it’s a straightforward process when you know what to expect. It’s more than just swapping out old pipes; it’s a systematic project designed to improve your home’s airflow, efficiency, and air quality. A professional replacement follows a clear, multi-step plan to ensure every connection is secure and every room gets the comfort it deserves. From the initial inspection to the final system test, each phase plays a critical role in the performance of your entire HVAC system. Let’s walk through the five key steps of a professional ductwork replacement.
Step 1: Assess and Plan the Project
Before any work begins, a thorough assessment is the most important first step. If you think your home might need new ductwork, it’s best to have a professional inspect it to confirm the issue and map out a solution. A technician will evaluate your existing layout, check for damage like leaks or crushed sections, and determine if the current sizing is right for your HVAC system. This planning phase is crucial for designing a new system that delivers balanced airflow to every room. A well-thought-out plan ensures the new installation will be efficient, effective, and tailored to your home’s specific needs, preventing future problems like hot spots or high energy bills.
Step 2: Remove the Old Ductwork
Once the plan is set, it’s time to remove the old system. This step requires care, especially in older Florida homes where you might find mold or excessive dust hidden away. Professionals handle this process carefully to avoid spreading debris throughout your home. They will systematically disconnect and extract the old ducts from your attic, crawlspace, or walls. Proper disposal of the old materials is also part of the job. This careful removal process creates a clean slate for the new system and is a key part of a professional duct sanitization and replacement service, ensuring a healthier start for your home’s air.
Step 3: Install the New Duct System
With the old ducts gone, the new system can be installed. This is where expert craftsmanship really matters. Installing new ducts correctly means sizing them right, routing them for smooth airflow, and securing every connection. The main trunk lines are installed first, followed by the smaller branch ducts that run to individual rooms. Each piece is carefully fitted and attached to ensure an airtight path from your AC unit to your vents. This meticulous process is essential for the overall performance of your air conditioning installation, as even small gaps or poor layouts can lead to major efficiency losses down the road.
Step 4: Seal and Insulate for Efficiency
After the new ducts are in place, the next step is to seal and insulate them. Every joint and connection is sealed with mastic paste or specialized tape to prevent air from escaping. Old, leaky ductwork is a significant source of energy loss, so this step is vital for efficiency. Once sealed, the ducts are wrapped in insulation, which is especially important in hot Florida attics. Insulation keeps the cool air inside the ducts from warming up before it reaches your living spaces. This ensures the air arriving at your vents is the temperature you set on your thermostat, helping your AC run more efficiently and lowering your energy bills.
Step 5: Inspect and Test the System
The final step is a complete inspection and system test. A technician will check their work, ensuring all connections are secure and the layout matches the plan. Then, they’ll turn on your HVAC system to test the airflow at each vent, making sure it’s strong and consistent throughout the house. This test confirms that the new ductwork is distributing air evenly, eliminating the hot and cold spots you may have experienced before. Any mistakes in the installation could lead to poor airflow and higher energy bills, so this quality check is essential. It’s the final confirmation that the job was done right and your system is ready to perform at its best.
What Tools and Materials Do You Need?
Tackling a ductwork replacement means you'll need more than just enthusiasm. Having the right tools and materials on hand is the difference between a job well done and a weekend full of frustration. While our technicians at 5 Star Air arrive with a fully stocked truck, a DIY approach requires careful preparation. Let's walk through what you'll need to get started.
Essential Tools and Safety Gear
First things first, let's talk safety. You'll be working in tight spaces with materials that can be sharp and dusty, so grab a pair of sturdy gloves, safety glasses, and a good dust mask. For the job itself, you’ll need a core set of tools. A reliable power drill is essential for securing connections, while tin snips are necessary for cutting sheet metal ducting to size. You'll also want a good tape measure for accurate cuts, along with various screwdrivers and pliers for adjustments. These basic hand tools are the foundation of any successful ductwork project, ensuring every piece fits together securely and safely.
How to Choose Duct Materials and Insulation
The materials you choose will directly impact your home's comfort and efficiency. The most common options are flexible ducts, which are great for tricky spaces, and rigid sheet metal ducts, known for their durability and airflow. Given Florida's humidity, it's crucial to select materials that resist moisture and mold growth. Just as important is the insulation. Proper insulation wraps your ducts and prevents that precious cool air from escaping into your attic. This simple step is key to maintaining good indoor air quality and keeping your energy bills down. Look for an insulation R-value appropriate for our climate to ensure maximum efficiency.
How Much Will Ductwork Replacement Cost?
Let’s talk about the budget. It’s one of the first questions homeowners ask, and for a good reason. The truth is, there’s no single price tag for new ductwork because every home in Florida is unique. Generally, you can expect a professional ductwork replacement to cost anywhere from a few hundred dollars for a small repair to several thousand for a full system overhaul. National averages often place the total between $250 and $12,000.
This wide range reflects the many variables that go into the project. Think of it like this: replacing a short, straight run of duct in an accessible attic is a much different job than re-routing an entire system through tight crawl spaces and finished walls. The size of your home, the type of materials you choose, and the complexity of the layout all play a major role in the final estimate. The best way to get a clear picture of the cost for your specific situation is to have a professional take a look. An honest technician can give you a detailed quote that breaks down all the expenses, so you know exactly what you’re paying for before any work begins.
What Factors Influence the Price?
Several key factors determine the final cost of your ductwork replacement. First is the size of your home—a larger house simply requires more ducting material and more time to install. The complexity of your current system is another big one. If your ducts are hidden behind walls, tucked into a cramped attic, or have a complicated layout, the labor involved will naturally be higher.
The type of duct material you select also affects the price, with options like flexible, sheet metal, or fiberboard ducts each having different costs. Finally, local labor rates and any necessary permits for the job will be factored into your quote. A trustworthy HVAC company will walk you through these variables to help you understand your estimate.
Breaking Down Material vs. Labor Costs
When you get a quote, it’s helpful to see how it splits between materials and labor. On average, new ductwork can cost between $20 and $60 per linear foot. For a home needing 100 feet of new ducts, the material and installation costs could land somewhere between $2,000 and $6,000. Labor is a significant portion of this because proper installation is a skill that directly impacts your system’s efficiency and lifespan.
While a DIY approach might seem tempting to save on labor, this is one job best left to the pros. Our team of licensed technicians ensures every connection is sealed tight and the system is balanced for optimal airflow. A professional ductwork replacement prevents air leaks that drive up energy bills and ensures your home stays comfortable for years to come.
Are There Any Hidden Costs to Consider?
A transparent quote should cover everything, but it’s smart to be aware of potential extra costs. Sometimes, accessing old ductwork requires cutting into drywall or ceilings, which may need patching and painting afterward. The removal and disposal of your old, deteriorating ducts can also add to the project cost.
Occasionally, a duct replacement can reveal that other parts of your HVAC system are underperforming or incompatible with the new, efficient ductwork. A technician might recommend an upgrade to get the most out of your investment. We believe in honest pricing with no surprises, and if unexpected costs arise, we’ll discuss them with you immediately. We also offer flexible financing options to help manage the expense and make your home comfortable without breaking the bank.
Should You DIY or Hire a Professional?
When you’re looking at a big home project, it’s natural to wonder if you can save some money by doing it yourself. While tackling a weekend painting project is one thing, replacing your home’s ductwork is a different beast entirely. This job is much more complex than it looks, and a small mistake can lead to big problems down the road, like poor airflow, higher energy bills, and even a shorter lifespan for your entire HVAC system.
The truth is, the potential savings from a DIY approach can quickly disappear when you factor in the cost of fixing mistakes. This is one of those jobs where calling in an expert is almost always the smarter, safer, and more cost-effective choice in the long run. A professional ensures the job is done right from the start, giving you peace of mind and a comfortable home. At 5 Star Air, our approach to air conditioning installation always includes a thorough evaluation of your ductwork to guarantee your system runs perfectly. Let’s break down exactly why hiring a pro is so important.
The Benefits of Professional Installation
Hiring a professional HVAC technician means you’re paying for expertise, and with ductwork, that expertise is critical. A pro knows how to correctly size, design, and seal a duct system for your specific home, ensuring balanced airflow and maximum efficiency. When you attempt it yourself, it’s easy to end up with uneven temperatures, where one room is an icebox and another is an oven. Even worse, poorly installed ducts can leak conditioned air into your attic or crawlspace, forcing your AC to work overtime and driving up your energy bills. A professional team has the right tools and experience to get the job done efficiently, saving you from the frustration and potential damage of a DIY gone wrong.
Why You Need to Follow Local Building Codes
Beyond just getting the job done right, there are legal and financial reasons to hire a licensed professional. In Florida, installing or replacing ductwork is considered mechanical work that requires a permit and must be performed by a licensed HVAC contractor to meet local building codes. These codes are in place to ensure the work is safe and meets specific standards. Trying to bypass this can lead to fines and complications if you ever decide to sell your home. Furthermore, most HVAC equipment warranties specify that the system must be installed by a certified professional. A DIY installation could void your warranty, leaving you on the hook for expensive repairs if something goes wrong with your unit.
What Are the Risks of a DIY Replacement?
Tackling a home improvement project yourself can be rewarding, but ductwork replacement isn't your average weekend task. While you might be thinking about saving money, a few missteps can lead to bigger headaches and expenses down the road. An improperly installed duct system can strain your AC unit, hike up your energy bills, and compromise your home's air quality. Let's break down the most common risks so you can make an informed decision.
Common DIY Mistakes That Cost You More
It’s easy to assume that replacing ductwork is a straightforward swap, but small mistakes can have a big financial impact. Poorly sealed joints, kinks in flexible ducts, or improper connections create air leaks, forcing your HVAC system to work much harder to cool your home. This extra strain not only causes your energy bills to creep up but can also lead to premature wear and tear on your equipment. The money you hoped to save on labor can quickly disappear into the cost of future air conditioning repairs and higher monthly utility payments.
The Dangers of Improper Sizing and Airflow
One of the most critical parts of a ductwork installation is getting the size right, and this is where many DIY projects go wrong. Duct sizing isn't about what fits in the space; it's a precise calculation based on your HVAC system's capacity and your home's layout. If ducts are too small, they can restrict airflow, leaving some rooms feeling stuffy and warm. If they're too large, the air pressure will be too low, resulting in weak airflow from your vents. This imbalance is what creates those frustrating hot and cold spots and prevents your system from performing efficiently.
Understanding the Safety and Warranty Risks
Beyond performance issues, handling a ductwork replacement yourself comes with safety and compliance risks. HVAC work often requires permits to ensure it meets local building codes designed to keep you safe. Furthermore, most HVAC equipment manufacturers will void their warranties if the system isn't installed by a licensed and certified professional. If something goes wrong with your AC unit down the road, you could be on the hook for the full cost of repairs or even a replacement. Working with a fully licensed and insured team protects your investment and gives you peace of mind that the job is done correctly and safely.
How Long Does a Ductwork Replacement Take?
One of the first questions homeowners ask when considering new ductwork is, "How long will my house be turned upside down?" It's a fair question. You want to know what to expect so you can plan your life around the project. The good news is that a professional replacement is often quicker than you might think. The exact timeline depends on the size of your home and the complexity of your duct system, but we can break down a typical schedule and look at what might cause delays. A professional team works efficiently to minimize disruption, getting your home’s airflow back in top shape without a lengthy interruption.
A Typical Timeline for a Professional Job
For a standard home, a professional team can typically complete a full ductwork replacement in about one to two days. This timeline covers removing the old, inefficient ducts and installing a brand-new, properly sealed system. If you have a larger home or a more complex HVAC setup, the project might extend to four days or more. The key here is "professional." Experienced technicians, like our team at 5 Star Air, have the process down to a science. We arrive with the right tools, materials, and a clear plan to get the job done efficiently, ensuring your ductwork replacement is handled correctly from the start.
What Can Make the Project Take Longer?
Several factors can stretch out the replacement timeline. The biggest variable is accessibility. If your ducts are located in tight crawl spaces or hard-to-reach attics, it naturally takes more time for technicians to work safely and effectively. The project can also take longer if we uncover other issues during the removal process, like mold or pest damage that needs to be addressed. This is also where a DIY project can go off the rails. What seems like a weekend job can quickly become a month-long headache due to incorrect sizing or poor sealing. A simple duct replacement is best left to pros to avoid these costly and time-consuming mistakes.
How to Choose the Right Ductwork for Your Home
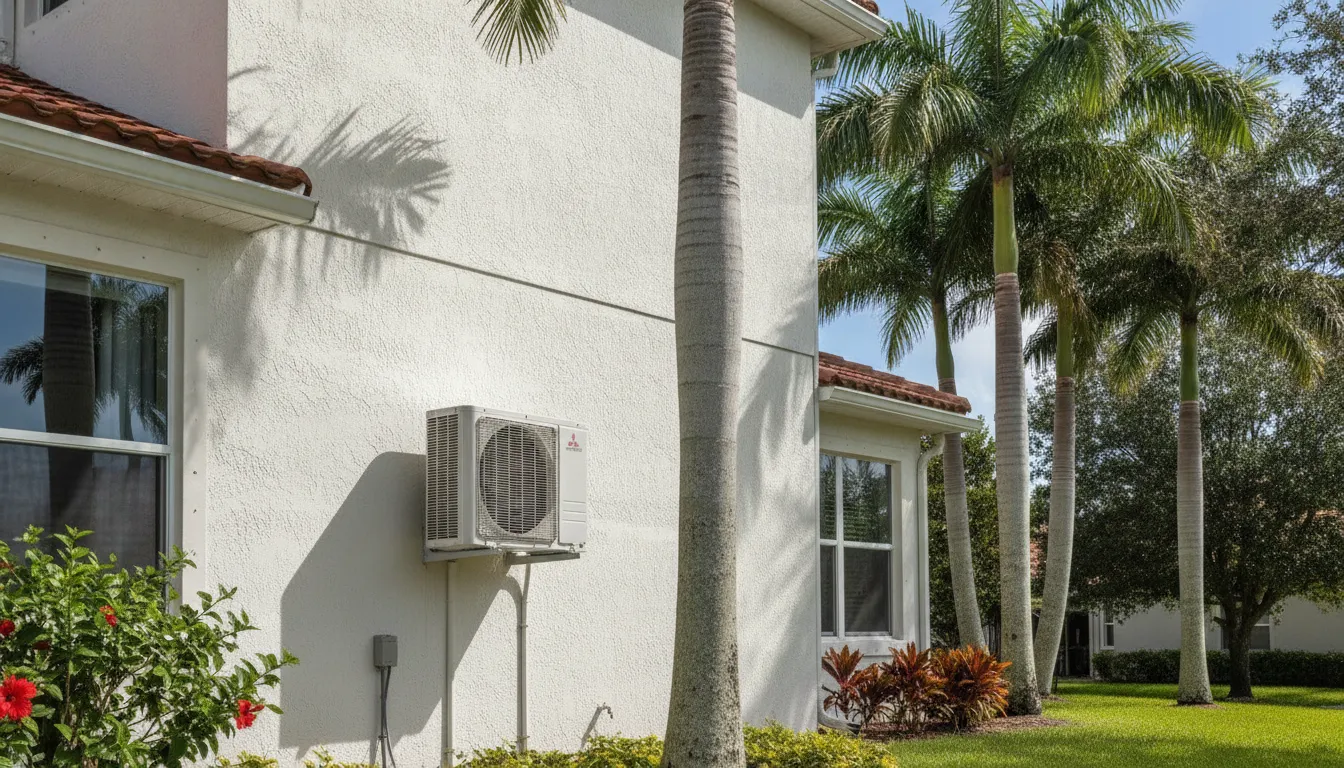
Picking the right ductwork for your home is a big decision that directly impacts your comfort, energy bills, and air quality for years to come. It’s not just about connecting vents; it’s about creating an efficient, sealed system that works seamlessly with your HVAC unit. Think of your ductwork as the circulatory system for your home's air. If it's leaky, undersized, or made from the wrong materials, your AC unit has to work overtime just to keep you comfortable, which means higher energy bills for you. The two biggest factors you’ll need to consider are the type of material the ducts are made from and the quality of their insulation. Each choice has its own pros and cons when it comes to cost, durability, and performance, especially in the demanding Florida climate where attics can reach extreme temperatures. Making an informed decision here will help you avoid common issues like energy loss, poor airflow, and humidity problems down the road. Let’s break down what you need to know to choose the best system for your home.
Comparing Different Types of Ductwork
When you start looking at ductwork, you’ll find a few different options, but the most common are flexible and sheet metal ducts. Flexible ducts are typically less expensive upfront and easier to install in tight or awkward spaces. However, they are more prone to kinks, tears, and sagging over time, which can restrict airflow and shorten their lifespan. Sheet metal ducts, usually made from galvanized steel or aluminum, are the gold standard for durability. They are rigid, long-lasting, and provide better airflow. While they cost more, their longevity often makes them a better long-term investment. A professional ductwork replacement can cost anywhere from $20 to $60 per linear foot, so choosing a durable material can save you from having to do the job all over again in a decade.
What to Look for in Insulation and Quality
In Florida, your attic can feel like an oven, which is why ductwork insulation is non-negotiable. Without proper insulation, the cool air your AC produces will heat up as it travels through the ducts, forcing your system to work much harder and driving up your energy bills. Old, poorly insulated ductwork is a major source of energy waste. When choosing new ducts, look for a high R-value, which measures thermal resistance—the higher the number, the better the insulation. Quality installation is just as important. Even the best materials won't perform well if the ducts aren't properly sealed at every joint. Leaky ducts pull in dust, allergens, and humidity from your attic, which can seriously compromise your home’s indoor air quality and lead to mold growth.
How to Maintain Your New Ductwork
Once your new ductwork is installed, you’ll want to keep it in top shape to protect your investment and ensure it runs efficiently for years to come. Think of it like a new car—a little regular attention prevents major problems down the road. Keeping an eye on your system helps you catch small issues before they turn into costly repairs, maintains healthy air quality in your home, and keeps your energy bills from creeping up. A few simple checks and a professional tune-up now and then are all it takes to keep everything running smoothly.
Your Regular Inspection Checklist
You don’t have to be an HVAC expert to spot the early warning signs of ductwork trouble. About once a season, do a quick check-in on your system. Pay attention to how your home feels and sounds, and look for any changes. Here’s what to watch for:
- Uneven Temperatures: Are certain rooms suddenly much hotter or colder than others?
- Excessive Dust: Noticing more dust on your furniture than usual? This can point to leaks.
- Rising Utility Bills: An unexpected jump in your energy costs often means your system is working overtime due to an issue.
- Strange Noises: Banging, whistling, or rattling sounds from your vents aren’t normal.
- Musty Smells: Foul or musty odors can be a sign of moisture or mildew, which can contribute to poor indoor air quality.
- Visible Damage: Take a peek at any accessible ductwork in your attic or crawlspace for obvious tears, gaps, or rust.
Why Professional Maintenance Is Worth It
While your own inspections are helpful, they can’t replace a professional’s trained eye. Scheduling regular air conditioning maintenance is the best way to ensure your entire HVAC system, including the ducts, is working correctly. A licensed technician can perform comprehensive checks that go beyond a simple visual inspection. They’ll test airflow, check for hidden leaks, and make sure every connection is perfectly sealed. This not only extends the life of your ductwork but also ensures your system operates at peak efficiency, saving you money and giving you peace of mind. It’s a small investment that protects the comfort and health of your home.
Related Articles
- Duct Replacement Services
- 5 Signs Your AC Needs Repair
- Benefits of Regular HVAC Maintenance
- HVAC Tips & Insights Blog - Expert Advice from 5 Star Air
Frequently Asked Questions
My ducts have a few leaks. Do I really need to replace the whole system? That’s a great question, and the answer really depends on the age and overall condition of your ductwork. If your ducts are relatively new and you have one or two minor, accessible leaks, a professional repair and sealing job might be all you need. However, if your system is over 10-15 years old, has multiple leaks, crushed sections, or signs of mold, a full replacement is often the more cost-effective solution in the long run. Patching up an old, failing system can be a temporary fix that ends up costing you more in high energy bills and future repairs.
If I get new ductwork, does that mean I need a new air conditioner too? Not necessarily. New ductwork can be installed to work with your existing AC unit, and you'll likely see a major improvement in performance and efficiency right away. That said, replacing your ducts is the perfect time to have a professional evaluate your entire system. If your air conditioner is also getting older or wasn't sized correctly for your home in the first place, pairing it with a new, efficient duct system might not give you the best results. A technician can help you decide if it makes sense to upgrade both at the same time for maximum comfort and energy savings.
My AC is so loud when it kicks on. Can new ductwork help with that? Yes, it absolutely can. A lot of the noise you hear from your HVAC system comes directly from the ductwork. Old, undersized, or poorly designed ducts can create a high-pitched whistling sound as air is forced through tight spaces. You might also hear rattling or banging from loose connections. A new, properly sized and secured duct system allows air to flow smoothly and quietly, which can dramatically reduce the noise you hear when your system is running.
How soon will I notice a difference in my home's air quality after a replacement? You should notice a difference almost immediately. Old, leaky ducts pull in dust, insulation fibers, and allergens from your attic or crawlspace and blow them directly into your living areas. By replacing them with a new, completely sealed system, you eliminate that source of contamination. Many homeowners tell us they notice less dust on their furniture within the first week and that the air simply feels cleaner and fresher to breathe.
What's the mess like? Will my house be a disaster zone during the installation? We understand that having work done in your home can be disruptive, and our goal is to make the process as smooth as possible. Professional technicians take great care to protect your home by using drop cloths and cleaning up the work area thoroughly at the end of each day. While the work itself involves removing old materials and bringing in new ones, a reputable team will handle it systematically to contain the mess and minimize the impact on your daily life.